Winter photography is a wonderful thing. I love putting on my macro lens and looking for frost and ice. The macro world of frost and snow really is quite amazing. That said, cold weather itself presents three very real challenges: fogging, battery life, and correct snow exposures .
If you wear glasses, then you are already intimately familiar with fogging. When optics are confronted by a very large positive temperature change, water condenses onto them. For glasses, this isn’t a big deal; we can just take them off and wipe them with a clean cloth and we’re good to go.
For our camera optics, this can be a Bad Thing. It is possible to get condensation on the inside as well as the outside of your camera or lens. To guard against this, you can try to warm your camera up slowly. I usually leave my camera in the bag so that it warms as slowly as possible, which keeps things happy.
If you do get condensation and need to use your camera, you can clean its lens using methods recommended by the manufacturer. Usually this means using a clean optical cloth. If you get condensation inside your lens then you will just have to wait for the lens to clear up. Usually the lens will be fine after that.
Moving on to batteries... they perform pretty poorly in cold temperatures. The nice thing is that the batteries will come back to life as soon as they warm up. In cold conditions, I like to carry a second battery that I keep inside my coat. Every so often I swap out the batteries, which keeps at least one operating pretty well. Spare batteries, while sometime not cheap, are a very good idea.
One very cold morning in Bryce Canyon National Park (-4F if the car’s thermometer is to be believed) I spent about an hour getting pre- and post- sunrise pictures. I had to warm my camera’s battery several times to keep shooting. I also discovered just how difficult using a camera’s small controls with winter gloves can be. My gloves were actually even too big for me to easily use my shutter release remote.
The third and most technical concern with winter shooting is snow. When your camera takes a picture, it does its best to figure out how bright things should be. This process produces the calculated exposure. The problem, though, is that the camera is programmed for ‘proper’ exposure for pretty much any occasion...except for lots of snow (or lots of bright sand...).
When you take a picture of a snowfield or a scene that is mostly snow with a bright sky, your camera will underexpose your shot by a bit. That means that your fresh, white national park snow looks a bit like gray side-of-the-road snow. This is normal and expected, and you can handle it in one of two ways -- in the camera or in software on your computer.
Many cameras have a scene mode. On my Canon PowerShot G10 it is labeled ‘SCN’ and the thumbwheel allows you to cycle through a number of special shooting conditions (aquarium, fireworks, underwater, foliage, and snow). By telling the camera that you are shooting snow, it should correct itself and give you great results.
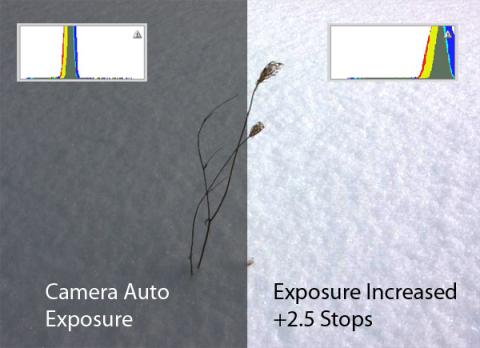
If you want to correct the exposure in software, then you can easily do this by changing the exposure up a stop or two. In the picture that accompanies this post, you can see the difference between the camera’s selected exposure and my edit to increase the exposure by +2.5 stops. Quite a difference indeed!
How did I decide on +2.5 stops? Well, I really just eyeballed it. I increased the exposure control until I thought the snow looked like snow and it just happened to be +2.5.
One final thought on increasing the exposure of your snow shots: be very careful not to blow out the highlights of your picture (unless that’s what you are after...). How can you tell if you’ve gone too far? Well, it depends on the software that you’re using for your image adjustments, but most photo editing software should show you a histogram representing your image’s brightness.
Understanding and using a histogram is far beyond this article, but if your image’s histogram is tightly stacked to the right then you may have pushed the exposure up too far.
I included a snapshot of the histograms from Photoshop for each image example. Note how I shifted the histogram to the right. If I had shifted it a bit more, I would have lost detail in the snow and it would have been featureless white.
Good shooting!


Comments
Another aspect in addition to your last hint: Underexposure usually can be corrected pretty well after the shot on your computer. But overexposure means that the white is flared out, details are lost and can't be resurrected. So if 2.5 stops looks good on the camera display, it might be wise to take another shot with just 2.0 or 1.5 and check out the details at home on your larger and maybe even calibrated monitor. There you can increase the brightness easily to just the point where white becomes white but the details are preserved.
Thanks for a timely and informative article.
Cold weather does present its own set of photographic challenges, but too many of us tend to leave our cameras indoors during the winter. Some of my favorite shots were taken on a December visit to Nome, Alaska, but at -21F I found after the first few minutes I didn't spend quite as much time composing every shot!