
After sunset and the beginning of nighttime, Mount Rainier National Park / Rebecca Latson
I’m not a night owl. I’m a sunrise kind of gal. But the lure of photographing the Perseid meteor shower was incentive enough for me to get myself and cameras out for some late-night-wee-morning-hour shots of the sky above “The Mountain” at Mount Rainier National Park in Washington state.
The park offers all sorts of prime viewing areas from which to view the Perseids. I chose the Sunrise area after multiple checks of the 10-day weather forecast. For 2023, August 12th was predicted to be peak viewing time. I arrived on the afternoon of the 11th and hiked to a nice spot along the Dege Trail for a setting sun timelapse before continuing to my favorite spot along Sourdough Ridge Trail for night shots. The next morning, I captured some wee-hour (4 a.m.) meteor shower shots at a different spot.
Upon arriving home after my meteoric weekend, I began editing my photos and noticed some things about the night sky I’d pass on to you: mainly how to tell the difference between a passing plane, satellites (there are scads of them in orbit), and an honest-to-gosh meteor streak.
Planes traveling across the night sky are easy to identify. They have a “morse code” look to their light trail. Also, they move from frame to frame quickly in a generally-horizontal line across the sky.
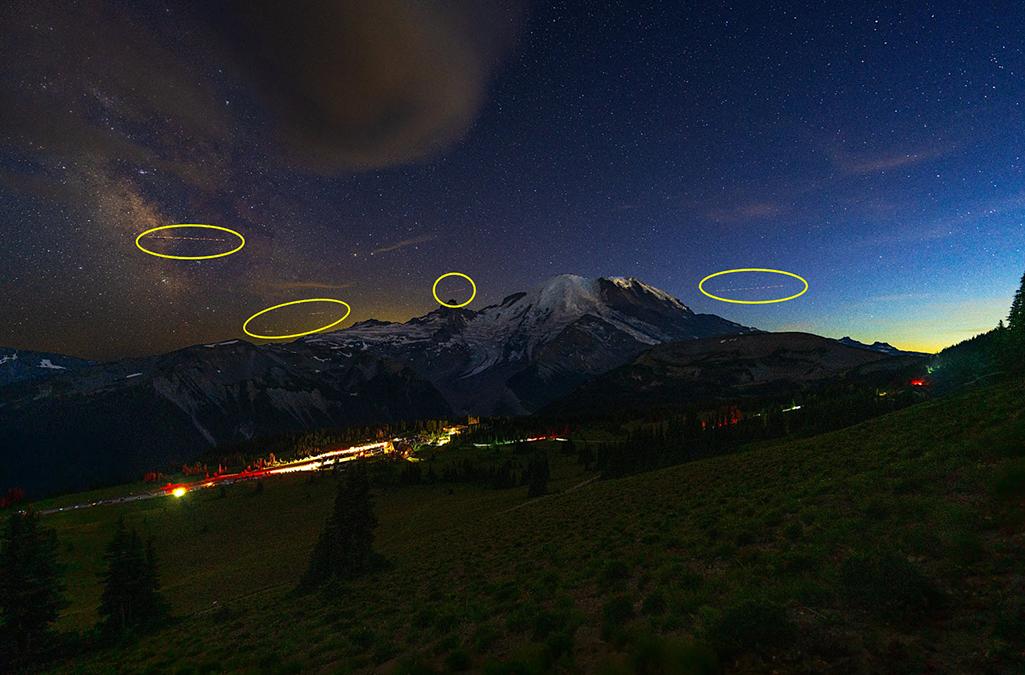
Plane light tracks in the night sky over Mount Rainier National Park / Rebecca Latson
Satellite trails tend to be much fainter than planes and their lights may be vertical, angled, or horizontal. Unlike planes, which have bright, exterior blinking lights, satellites have no exterior lights and when you see a satellite in the night sky, you are looking at sunlight reflected as a pale blue or white line off of the satellite exterior.

Planes, satellites, and meteors over Mount Rainier National park / Rebecca Latson
Meteors, on the other hand, are colorful streaks of very bright light. Notice in the shot below that the meteor streak contains bright pink, yellow, green, and blue colors. It moved fast, too. Meteors are speedier than planes or satellites, and their light dies out quickly. If you keep your eyes peeled in just the right spot at just the right time to view a larger meteor (meteors can range from the size of sand grains on up), you might notice a round-ish “bulb” at one end of the meteor streak tapering into a bright, colored stripe. The larger the meteor, the more chance of noticing that “bulb.”

In the right place at the right time during the Perseid meteor shower that night, Mount Rainier National Park / Rebecca Latson
Aside from meteor light, the other lines of light are pesky-looking against the night sky. Thankfully, they are easy to remove using your photo editor’s remove/erase/clone-out tool.
Not included in this column’s title but included here is this little blurb about creating timelapses. I wrote a 2018 article about timelapses for the Traveler. Cameras have changed a bit and timelapse menu settings are much easier, IMO. Smartphone timelapses are also very easy to create, except getting decent reels of a starry sky might be problematic. You’ll need a tripod for your smartphone just like you do for your SLR.
SLR Timelapse Takeaways
Most cameras nowadays will have a menu setting for “timed-interval shooting” or “timed-interval function.” This means you set the number of shots you want and the number of seconds between the camera automatically capturing each image. All the images can then be combined with a photo editor like Adobe Photoshop to produce a short video clip (excuse me – reel, as they are now called).
For a 20-second reel, you’ll need to capture about 300 photos on your camera. The time it takes to capture all those 300+ images is dependent upon the shooting interval you set between each image. I set up my camera to capture a shot every five seconds. This was about 25 minutes’-worth of shoot time (on a tripod – don’t attempt this kind of thing handheld).
While I don’t want to get too much into the weeds here with photo editing explanations, I do want to still explain the steps taken to create timelapses and starry sky still shots. So bear with me, here.
For my timelapse reel, I use Adobe Lightroom and Photoshop. In Lightroom, I batch-apply a preset and/or other edits to all the interval shots at the same time. It’s an easy couple of steps: apply your edits to the first interval shot in your series, highlight the edited shot and all the other shots you want in your timelapse, and click the “Sync Settings” button on the lower right of the screen. Save those images as jpgs (smaller, takes up less space and your photo editor won’t slow down) in a specific folder for your timelapse. Also, make sure those images are in numerical order, or else Photoshop will have something to say about that when you go to create your reel.

Editing the shots for a timelapse in Adobe Lightroom / Rebecca Latson
In Adobe Photoshop and click File – Open. Select the first image in your timelapse series. At the bottom of the screen will be a small box labeled “Image Sequence.” Click that box, then go back and highlight all the other images for your timelapse.

Preparing the timelapse images in Adobe Photoshop / Rebecca Latson
Click “Open”, select your FPS (frames per second) speed and Photoshop will create a timelapse for you.
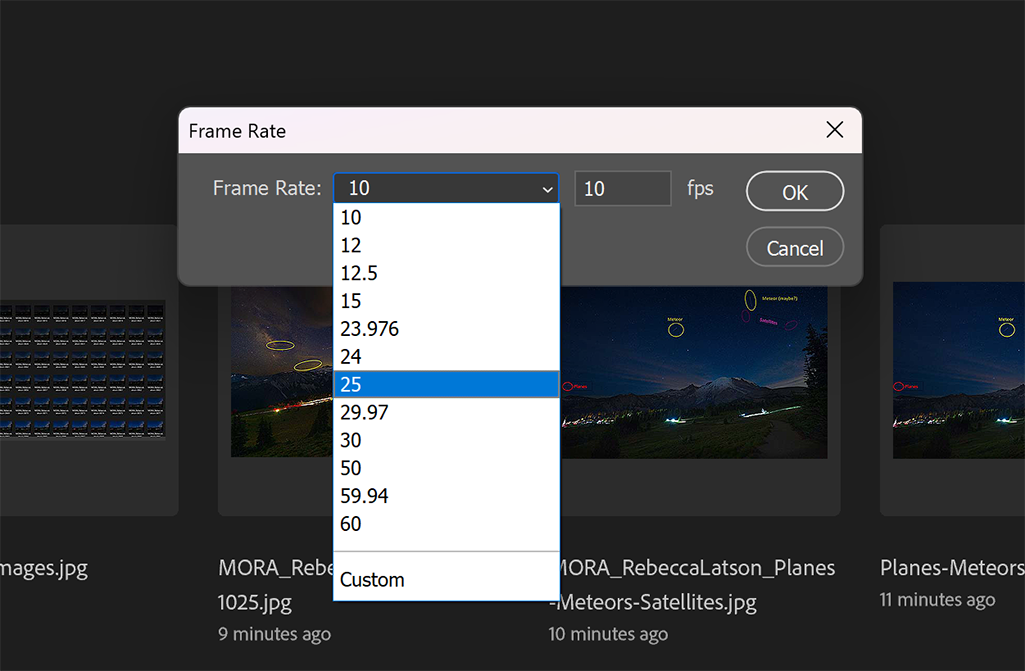
Selecting your FPS speed (how many frames appear in a second) for your timelapse / Rebecca Latson
You can use edits for your timelapse or keep it as-is. When you are ready to save, click File – Export – Render Video.

Choices you can make (or leave the default settings) before you render (create) your timelapse video / Rebecca Latson
Ok, this is all pretty simplistic just so you see the basics. Plus, I know not all of you use Photoshop, so you’ll need to do some Google searching to figure out how to combine separate images into a timelapse reel using your photo editor of choice.
Starry Sky Photo Takeaways
Always use a tripod for your night sky images. Use a “fast” wide-angle lens, if you have one or can rent one. A good wide-angle lens for night sky imagery will range from 11mm – 16mm. A fast lens is one that has an aperture with the capability of a large opening to let in as much light as possible (fstop of 2.8 to 1.4). Play around with wide apertures (f3.5 – f1.4), slow shutter speeds (10 – 30 seconds), and high ISOs (1000 – 6400+). Use a corded or wireless remote instead of using your finger to click the shutter button, which can cause a small amount of vibration. The less vibration, the clearer your shot will be. If your camera has a two-second self-timer, that works fine, too, for reducing shutter-click vibration.
Your resulting images might appear a little “noisy” (grainy), meaning you’ll notice a “granular” or “sandy” look to your image. There are a couple of ways to reduce this noise: application of a noise-removal plug-in such as Imagenomic Noiseware, Topaz DeNoise AI, DxO PureRAW 2, or ON1 NoNoise AI, or a process known as “stacking” whereby you capture several consecutive images of the same scene then combine them all in your photo editor to produce a single image resulting in less noise.
Meteor Shower Night Viewing Takeaways
This advice applies to any national park view area at which you might stake out a spot for some night sky / meteor shower photography. First and foremost, stake out your spot early and just stay there. Arrive as early as you think you can handle, because the closer to peak meteor shower night it gets, the more people are going to be there to witness the spectacle.
Don’t even think about driving off to check into your lodge room or visit another area, because there will be NO parking upon your return.
I’d spent the night of the 11th photographing the stars and meteors into the wee hours of the morning of the 12th. I then hiked the Dege Peak Trail, ate a little lunch, and drove to my lodging for early check in and a little nap prior to that night’s photo activities. Big mistake! On a special night like a peak meteor shower night, I should just have remained in the park in my photo spot for the duration. By the time I returned to the Sunrise area that evening around 8 p.m., thinking I’d avoided waiting in a long line just to enter the park, I discovered to my chagrin that every single parking space at Sunrise was occupied. Every single illegal parking spot was also occupied. People began double- and triple-parking as well as alongside the road where they should not have been parking in the first place (no shoulder and the vehicle tires trampled flowers and grass beside the road). I saw one tired-looking ranger out there who was not directing traffic but instead slapping warnings on illegally-parked cars. Only one ranger. Scads of people were walking alongside the narrow road toward the Sunrise parking lot, walking in the middle of the road, walking off trail on fragile meadow ground, walking everywhere just to get to a view spot for the meteor shower. And they stayed put for the duration of the night, because a check of the Sunrise webcams next morning showed the crowds still there.
Did I try elsewhere? You bet. Did I succeed? Nope. Oh, I’m sure I could have traipsed a backcountry trail somewhere with a view of Mount Rainier, but unless I am familiar with a trail route, I’m not going to attempt a hike on a trail in the dark with just a headlamp, loaded down with a camera pack in unfamiliar territory.
Despite the pandemonium of peak meteor shower night, I’m pleased with the shots I did achieve the night and morning prior, and I at least now know what I will do for next year’s Perseid meteor shower. I’ll be prepared. You should be prepared too, if you wish to do this. And I certainly hope the park is more prepared than it appeared to be that one night.
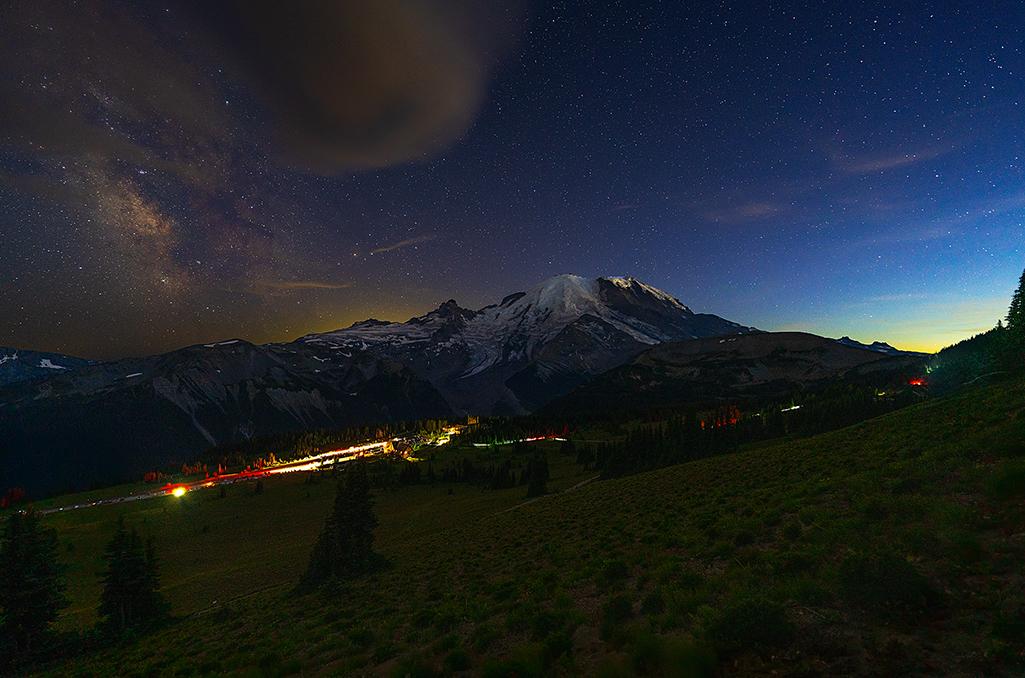
Nighttime at Sunrise, Mount Rainier National Park / Rebecca Latson

